|
Create Your Own Decorator Artwork Using Various Rubber Stamping Techniques. See Some Examples by Ann Craig.
I love original Decorator Artwork, and over the years have graced my walls with both my own paintings, and those bought at exhibitions. I don't mind if these pieces are made by less than well known artists - the fact that they are hand made is very important to me. Stuart and I also collect artwork from any overseas countries we visit. This is our form of having souvenirs and we have art from Mexico, USA, Canada, Fiji, Bali, Java, Papua New Guinea, Singapore, Alaska, Greece and of course our indigenous Aboriginal artwork from Central Australia. These works take the form of paintings, sculptures, masks and story boards. As I learned more rubber stamping techniques, I thought to myself that it should be possible to make "stamped pictures". I started small and simple. I found these raw wooden frames, complete with the double matting at my local Bunnings Warehouse and could see them being very useful as a starting point.
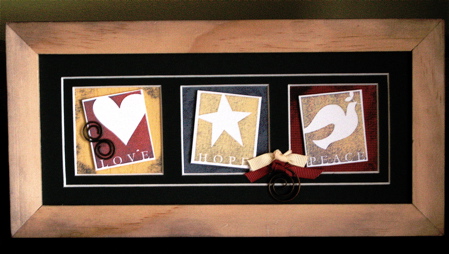
My first effort was this Christmas picture Frame. I used simple stamping techniques:- Rock'n'Roll on the raised images (heart, star and dove) and Stampin' Up! background stamps on the background pieces of card. A little direct to paper swiping of the ink pad around the edges of the background squares finished the overall composition by taking each of the colours throughout the project. I raised the images up from the background using Dimensionals from Stampin' Up! - I find these just the right height and the hexagonal shape provides a great base for the raised card. I am always wary of using too many embellishments as they can overpower the images, but in this case I thought a little Stampin' Up! Grosgrain Ribbon and Hodgepodge would do the trick. The frame is raw pine and altogether a bit insipid for the effect I was seeking so I sponged some SU ink directly onto the frame to soften the colour. The photo was taken without the glass covering to avoid distorting the images, but the glass is now in place and the entire Artwork is kept free from dust and other household hazards!
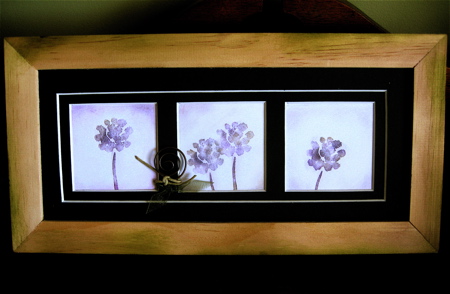
As this first piece was a seasonal item of Decorator Artwork that would be put away until the big Christmas decorating event that occurs in this house every year, I thought an everyday stamped Artwork would be good to have on display all the time. I love flowers so out came my Heartfelt Thanks rubber stamp set. This very simple image was just what I was looking for. I stamped the images with Versamark Ink then used my Stampin' Pastels for the colouring. The subtle colour changes that can be achieved with this medium are delightful. Again I kept it simple - a limited colour range, slight variations in positions of the images and a little shading on the edges of the background. If you would like more information on these projects, Contact me to learn how to make your own original Decorator Artwork with rubber stamps. 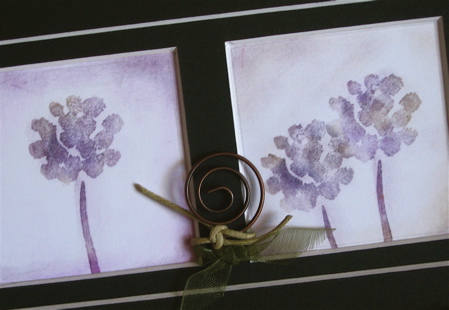
These examples are quite small in finished size, but stay tuned for larger stamped Decorator Artwork projects. I have so many artworks that I want to make, and would love to share some of my ideas with you. Just have to make time to get them done! You may find that you have plenty of completed projects, and would like to find out about making money from them.
Check out this link for some information.
Click here You can see some of my non stamping artwork here
|