|
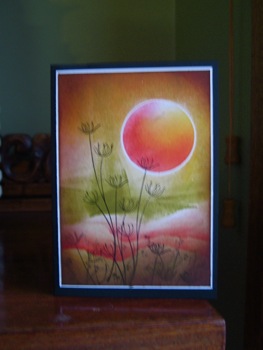
Creative Brayer BackgroundsCreating brayer backgrounds for cards is a bit confronting if you are inexperienced at working with the technique. However with just a little practice and knowledge of "how to use the brayer" you'll find it a rewarding and fun experience. I love the fact that I didn't quite know how it was going to work out. I have a fairly good knowledge of colour theory from many years of teaching high school art, and therefore was able to choose colours that blended without going muddy. The secret to this is to choose colours that are near each other on the colour wheel, and then add perhaps just one complimentary colour for contrast. Here is the finished card.
The inspiration for this card came from my down-line Jenni Agnew, who taught me the basics of brayer backgrounds at one of her classes. When the sky colours were being applied onto the card, the sun was masked out by using the 1 and 3/4 inch punch on a sticky note and I later used the negative of the sticky note as a mask while I sponged the colour onto the sun. This resulted in the wonderful white circle around the rim of the sun - totally accidental, but I'm very happy with the result. I make it a habit to leave bits of white card showing through in most of my coloured cards, whether they be watercoloured, blender pen or pastel, so I did the same with the lower third of this card. I wanted to sponge and mask hills, but somehow managed to get a big blob of green on the card, so decided to use the brayer at different angles with a torn "hill mask". I ended up liking the angular contrast to the soft rolling hills.
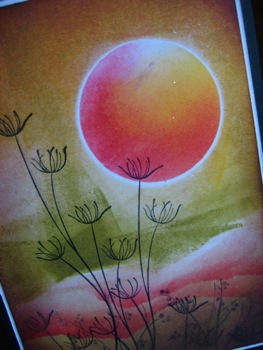
The detail photo illustrates this. I've used the very versatile and much loved stamp set Stem Silhouettes to create the the flora detail. Some of the images are "stamped off" to create the effect of distance, and others have just some portion of the stamp on the page. You can create so much variety simply by changing the angle or position of the stamp on your card. I see this card as a real mixture of realism and graphic work, and wanted to create a strong card base that would enhance the stamped and brayered background images. Due to the strength of the white circle around the sun, I determined that a thin white border would enhance my work and the black card base picks up the black of the Stem Silhouettes images. I finished off the stamped part of the card by sponging the edges with Close to Cocoa Classic Ink. I like the way sponging on the edges gives the card a finished look. What do you think? Have a look at the latest Stampin Up Promotions on my Demonstrator Website.
|