|
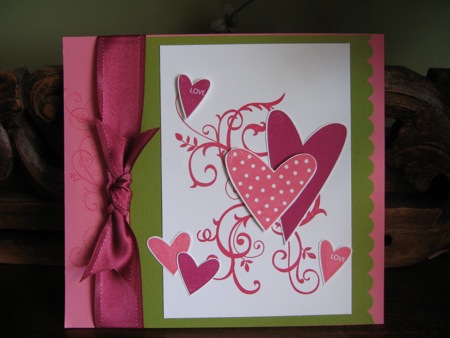
Create Various Valentine Cards Using A Variety Of Stampin' Up Products.Valentine Cards are an expression of love for those we care about. You may wish to create a romantic card, a card for a friend or a family member like a parent or child. That means there will be a wide variety of styles that can be created, and of course we must not forget the humorous cards. The most universal symbol of love is the heart, and there are many different shaped and sized heart stamps available on the market today. There are also lots of heart shaped punches that can be used creatively in your craft work. The cards I've made for you use my favourite products that come from Stampin' Up. I love Stampin' Up! products because of the high quality, the deeply etched rubber on the stamps and the wonderful colour range that is available in the inks. The first 2 Valentine Cards I made are based on the same simple sketch.
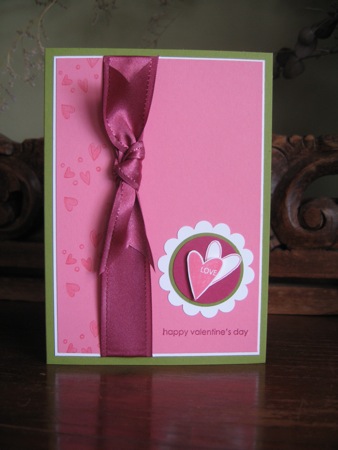
The products used in this card are as follows: Card: Whisper White, Old Olive, Regal Rose, Purely Pomegranate. Stamps: Forever In My Heart, Sprinkles, A Happy Heart (Summer Mini Catalogue) Inks: Regal Rose, Purely Pomegranate. Accessories: Circle Scallop Punch. 3.5 cm Circle Punch, 3.2 cm Circle Punch, Blender Pens, Mini Glue Dots, Wide Pomegranate Satin Ribbon, Paper Snips. To create the card, start by randomly printing the hearts from the "Sprinkles" set along the LHS of the Regal Rose card. Use the blender pens and ink from the Regal Rose Classic Ink Pad. Make a well in the lid by squeezing the ink pad between your fingers before you open it up. You'll find enough ink has transferred onto the lid of the ink pad container for you to load your blender pen and apply the colour to the images. Stamp the hearts for the centre of the circle, on some scrap white, while you have the ink pad open. Layer the Rose card onto the white and stretch the ribbon from top to bottom.
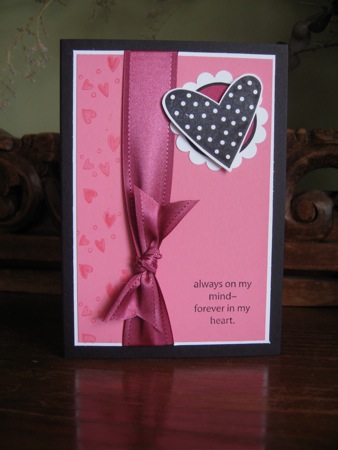
HINT: I always like to use the Mini Glue Dots to adhere ribbon. They are so sticky, and are very easy to position on the ribbon. You simply lie the ribbon onto the dot, press and peel away. The dot will adhere to the ribbon and then you can attach it to the back of your card. Cut another piece of ribbon to tie a knot and secure it to the card with another Mini Glue Dot. Construct the circular motif, position the hearts on any angle you desire, adhering one directly to the circle motif and raise the other up on a dimensional. Adhere all elements to the base card (Old Olive). See how the second Valentine Card uses the same concepts, with slight changes to the positioning of the elements, a different shaped heart, a different greeting and using black instead of olive as the contrasting colour. The use of black tends to "modernize" the card and perhaps make it more suitable for a younger person.
The square card is a little more complicated, although still quite easy to create. It's just a matter of layering different coloured card stock and using some additional stamps and punches. I've added the swirls from Baroque Motifs and Priceless stamp sets. You may have noticed that I've used complimentary colours - Rose and Olive to create vibrancy to the card. You could try these ideas using your own favourite colours. Have fun combining stamps from other sets with your chosen heart shape and you'll create your own individual Valentine Card. Contact me to order any supplies you would like to create your own Valentine Cards
|