|
Little Boxes With Matching Note Cards Make Lovely Gifts For The Festive Season.
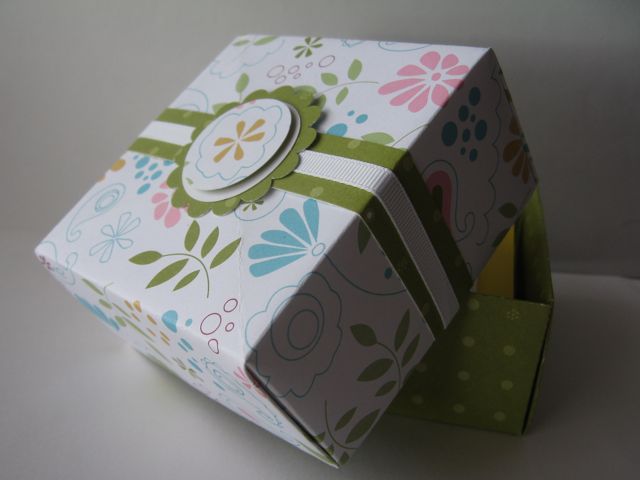
Boxes - love them! I'm enjoying making these little Origami creations so much that I had to think of things to do with them. What better than to include some cute hand stamped note cards, that will be useful to the person who receives the gift. I think these would make a great gift for the kid's teachers, and the children can help make them too - they are so easy. First step is to choose some lovely Stampin Up® Designer Series Double Sided Papers. It's a good idea when you're starting out to use the double sided papers so that you can be certain the patterns will co-ordinate. Second step is to decide on the size you want the box to be. As a guide - for a box that will neatly fit 7.5 cm square (or 3 inch square) note cards - the dimensions of the paper for the base should be 25 x 25 cm (10"x10") and the top should be about 26.5cmm square (10 and a half inches square). If you haven't seen the tutorial for these boxes you can view a video tutorial on K Werner's website here. For this project I used some of my favourite double sided papers - Petals and Paisleys.
I used the scallop punch, circle punches and left over strips of the paper to created the embellishment on the top. It is such bright and happy paper, so I thought the little bird from the Fun and Fast Notes stamp set from Stampin Up would be ideal as the image on the note cards.

I used quite a few Stampin Up products to create these little note cards - they measure 7 x 7 cm. Card stock - Pixie Pink, Yoyo Yellow, Very Vanilla and Old Olive. Water-colour paper Stazon Jet Black Ink. Stampin Write Markers - Pixie Pink, Ruby Red, Not Quite Navy, Old Olive and Summer Sun. Aqua Painter - fine. Matt Pack and paper piercer. Punches - Scallop Circle Punch, 1 and 3/8inch Circle Punch, 1 and 1/4 inch circle Punch. Adhesive - Dimensionals and Snail. I cut each of the little flowers out using the Stampin Up Paper Snips (they are the absolute best ever scissors for paper cutting) after I'd punched out the bird with the 1 and 1/4 inch punch. Hint - It's much easier to be accurate if you turn the punch upside down so you can look at the image while you're punching it out.
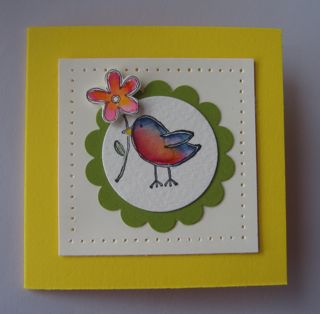
The close up shows the water-colour effect and the vibrant colours that can be achieved, plus the decorative edge made with the matt pack and paper piercer. If you would like a more detailed explanation of how to do water-colouring with the Stampin Write Markers you can find some information here. You can also contact me using this form. Now I'm sure you'll want to rush off and make your own version of these great little boxes and note cards. Just be careful to use good quality papers - it really does make a difference! If you need any Stampin Up® supplies you can place an order with me, and I'll have them posted directly to you. Postage and handling applies (minimum $5.95 or 5% of order total - whichever is the higher) Order your Stampin Up Supplies for this project.
|