|
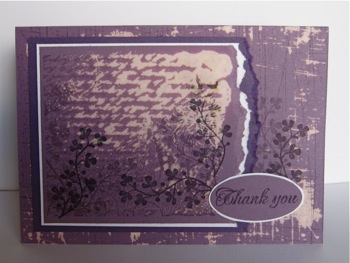
Stamping With Bleach -Ideas, Hints And Techniques.Stamping with bleach will give you many unique results, and can easily be used to create individual and beautiful cards.
The technique works well and is more obvious on darker coloured paper, but you can still achieve beautiful, subtle effects with pastel papers. The interesting results obtained are usually a bit serendipitous - you can't always control what will happen, but that is part of the mystery of this technique that will have you experimenting with a variety of stamps, papers and card stock, and enjoying the process. It is a good idea to keep a record of your experiments on the different coloured card, so that you'll have a handy reference each time you use this technique. Perhaps make up a swatch sampler and keep it together with a metal ring.
WARNING Bleach is a toxic chemical and must be used WITH CARE. Make sure when you're stamping with bleach that you are in a well ventilated room. Bleach has a very strong smell and can cause discomfort to those with chemical sensitivities. If possible work outdoors to avoid being affected by the bleach fumes. Wear gloves, an apron and protective eye wear to avoid splashes that may burn your skin. Never work with bleach near an open flame. This technique is NOT SUITABLE for children. Always wash your stamps, stencils and brushes with water immediately after use. The bleach will not harm your stamps if you follow this rule, in fact it may well clean up any residue of old ink on the stamps. Warm soapy water works well to neutralize the bleach.
Another HINT is to cover the stamp with Versa Mark before applying the bleach. This will help you obtain an even coverage when stamping with bleach, and will form a protective layer over the rubber image. Let's look at a couple of different techniques that are simple, but will give you wonderful results. 1. Stamping With Bleach This is the most straight forward of the bleaching techniques. It simply requires you to cover the rubber stamp with bleach and stamp it onto the card. You'll find making a Bleach Pad the most effective way of doing this. Fold paper towel to form a pad. Place this in a plastic container, preferably one with a closing lid to avoid drying out. (I use a Tupperware sandwich box). Pour enough bleach onto the towel to make it damp but not sloshy. Some people like to use damp paper towel, but this will depend on how strongly you want the bleach to react with the card stock.. "Ink" up the stamp by tapping it onto the damp paper towel and then stamp with bleach directly onto the card. In just a few seconds the image will start to emerge from the paper as it starts to dry. If you're feeling impatient you can hurry the process up with an embossing heat tool. Next you can add other colouring techniques to enhance the image. Try using coloured pencils on the lightened areas, or you may like to stamp over some parts of the image with darker ink. Just a note of caution here: - ensure the image is completely dry or you may find strange things happening to the ink that is applied on top.
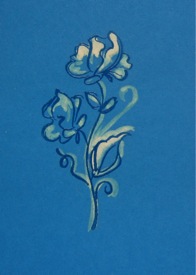
2. Painting Inside a Clear Embossed Outline. This stamping with bleach technique will give you a little more control over the outcome of you design. Stamp the image in Versa Mark and clear emboss it. The embossed outline will form a barrier and stop the bleach from spreading where you don't want it to go. It also forms a nice, slightly darker outline of the image which is enhanced by bleaching either inside or outside the image. Use a paint brush - some say nylon is best, to apply bleach to selected areas. You'll be able to achieve variations in lightness, by applying one or more coats of bleach to the areas. The more bleach applied the lighter the area will be. It is worth noting here that not all card stock will give you a white area when bleach is applied. Some are distinctly "yellow" and others tend towards "brown". This is because of the differing components that are used to make the various colours in card. Just add another sample swatch to your collection each time you try a new coloured card. 3. Shadow Bleaching Technique. Another quick technique that gives fabulous results. 
Solid or silhouette styled stamps work very well for this technique which simply requires you to stamp the image with ink that matches the card stock. For example use Old Olive Ink on Old Olive card. First stamp the image with ink, and allow it to dry. Next apply the same image, this time stamping with bleach, allowing some of the original image to show through. You'll create a gorgeous tone on tone effect that gives the illusion of depth, in just 2 simple steps. 4. Bleaching with a Stencil. Allow sufficient card to surround the stencil as you will use a mister or spritzer bottle for this technique, and the over spray will create interesting effects. Place the stencil (brass or plastic) onto the card stock. Just mist the area, don't saturate it, then wit a couple of minutes to see the spray pattern develop on the card. Remove the stencil and add any other techniques to complete the card. Remember once the bleach is DRY you can paint over it, stamp more images over it, add relief embellishments - whatever your project dictates. 5. Bleaching on Fabric. You may also like to try this technique on fabric to use in your cards or as background areas for scrapbooking. Use a darker coloured fabric that is Cotton based . You can apply bleach gel (that is thicker than normal house hold bleach) directly to the stamp, using a large brush. Obviously the stamp image would need to be bold for this technique, or you may prefer to go abstract and randomly paint swirls, blotches or spatters . The choice is yours. If a stamp is used, stamp onto the fabric that has been placed on a protective layer of card. Allow to dry thoroughly. You can possibly enhance the bleaching process by lying in direct sunlight. When the fabric is thoroughly dry it needs to be washed to remove any residue bleach that will be harmful to scrap book layouts.
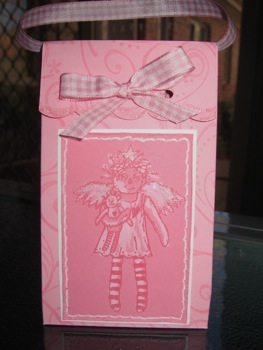
Now that I've given you some basic information you can let your imagination run wild and combine other stamping methods with one or more of these bleaching techniques. Because this has the possibility of being somewhat random, it is advisable to keep note of the results of your experiments for easy reference in the future. All images except the pink fairy are copyright to Stampin' Up. Please contact me if you require further information about this Stamping with Bleach page. Comment on the Stamping with Bleach information and examples
|