|
Make Your Own Invitations Suitable For All Occasions.Have you ever searched for the right Invitations to a special event, only to be disappointed with the lack of variety and individuality commercially available? I have, and this has led me to think seriously about making my own. Rubber stamping is a fun, cost efficient way of producing personalized invitations that can be colour co-ordinated to your event theme, and designed to compliment the special occasion. There are a number of techniques that you can use. They range from very simple to quite complicated. Most of us planning a special event, whether it be a birthday, engagement party, wedding or a backyard bar-b-que, will find that we are fairly time poor, so I have examples of some very quick methods and others that take more time. When you purchase rubber stamps to make your invitations, you'll have the bonus of the stamps being available time and time again. I love the Stampin' Up! range for this purpose as their stamps always come in sets that co-ordinate beautifully and allow many options for combining the different images. You may find a Stampin' wheel that has an intricate design more to your liking. Either way the possibilities are endless, limited only by your imagination. Rubber Stamping Your Invitations Let's look at an example that requires just one stamped image.
The image of the gum leaves and flower is from a Stampin Up set called "Bloom Away". You can find it on page 88 of the 2009 - 2010 Idea Book and Catalogue. It was a simple matter to prepare the text in a Word file on the computer, print it onto Confetti Cream card stock then quickly stamp the image in the top corner using Old Olive ink. It's a good idea to use a Stamp-a-majig to position the image, particularly in this case where I wanted to exclude the writing on the top of the image. A little sponging around the edge of the invitation, and a different image from the same set stamped onto the envelope, and the project of 25 pieces was complete in about 1 hour. Using a Wheel or Roller to Create the Image. The next example I have to show you is one made for an engagement party. The engaged couple wanted something that indicated a fun night, that would be casual but classy!
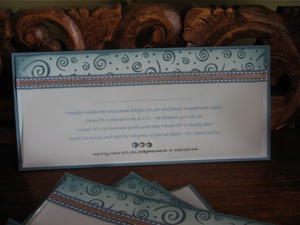
Because the couple are very special to me I took a lot of time making these invitations. They use a number of different products and this was a labour of love. Both people involved have bright personalities, so I chose this "happy" swirly image wheel. (Retired from Stampin Up). Co-ordinating card stock - Blue Bayou and Soft Sky, Blue Bayou double stitched ribbon with a little silver ribbon glued in the centre, and vellum card for the printing make up the list of products used. Stamping the image was the quickest part of making these invitations. I didn't have a cartridge, so I simply rolled the wheel along the classic ink pad before applying it to the card. It's always a good idea to this part first in case of mistakes like going crooked. You can remedy that problem by using a Stampin Around Wheel Guide but if you like to "do it alone" then it's definitely worthwhile doing this step first. A little sponging in the same colour ink will soften the edges and also cover over any slight mis-prints that may occur. Different Papers and Textures Create Interest. The engagement invitations, whilst using a traditional layout or "sketch", are unique because of a number of elements. The card colour combinations. The vellum overlay with individual poem personalized to the event. The double layering of ribbon - silver in the centre of Blue Bayou double stitched ribbon. The addition of rhinestones to separate the poem from the RSVP information. One of the aspects I really like about this concept or design is that it lends itself to being suitable for a wedding too. The rolled wheel image could easily be embossed in silver, gold, bronze or white, and the verse on the vellum can be changed. Co-ordinate Memory Books for each occasion. Another lovely option when making your own invitations is that you can make other items such a a Memory Book, to compliment the event and provide a record of attendees, photos and comments. Here is an example.
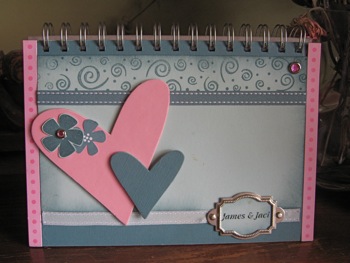
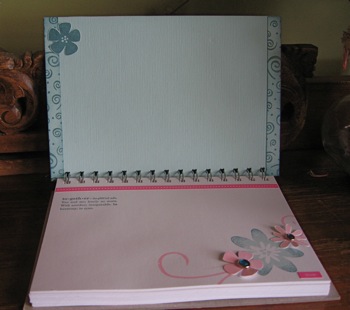
Note how the memory book has been tied in to the overall theme by using the same wheel stamp, colours and basic layout of the invitation. The additional pinks were added (favourite colour of the bride to be) plus some Silver Hodge Podge from Stampin Up. The hearts are covered chipboard and the pink borders are from a Simply Scrappin Kit. They are self adhesive and are quick and simple to use. Rhinestone brads from the "fire" selection add a bit of bling. The book is an On Board Art journal from Stampin Up. I love these journals - they have ample, good quality plain paper pages inside sturdy chip board covers. The covers are easy to decorate and the pages are great for adding photos, memoirs, stamped images etc. It may be advisable to remove some of the pages if you're going to add lots of extras to other pages, or you might like to adhere two pages together to form pockets. See Journal Ideas for more ideas on manipulating pages.
Your personal style will dictate the overall look of any invitation, journal or memory book you might make. The important aspect is that it will be made with love, it will be individual, and it will be very much appreciated.
Comments
|