|
Create Your Own Hand Made Christmas Cards Using Embossing And Water-colouring Techniques.We all love the Festive Season, don't we? Christmas cards, gifts, catching up with friends and spending time with family, are all high on my agenda at that time of the year. I love to decorate my home to provide a welcoming festive atmosphere for my family and friends. This year I am excited to have planned a number of decorations using Stampin Up Products, so keep an eye on this blog for special events and ideas for Christmas Decorating for your home. Last week I had what was to be the last of my Christmas card workshops, but I have so many ideas to share, and many of my regular guests couldn't make it in October, so I'm having another Christmas Cards workshop on November 12th (Wednesday). If you'd like to attend, and live in the Canberra area, just contact me for my address and details about the workshop. The cost is $15.00 per person. The projects made at the last workshop were all cards. I used Embossing on two of the cards and the Water-colouring with Stampin Write Markers technique on the other card. Here are the embossed projects.
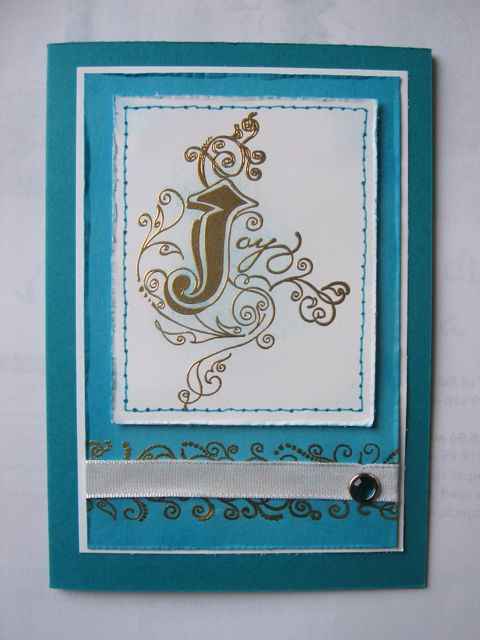
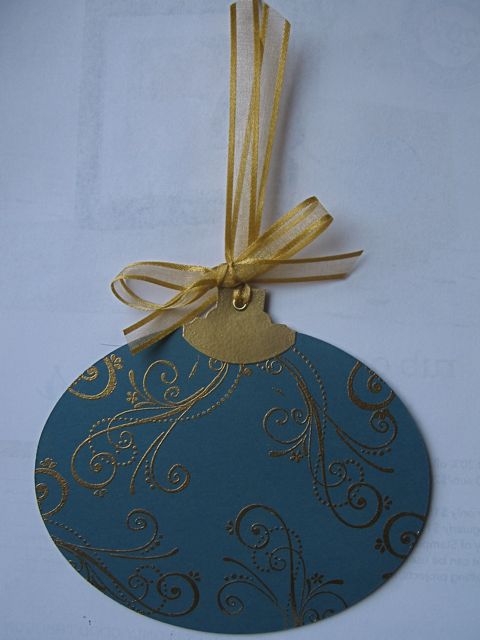
I've used the beautiful Illuminated Stamp set from Stampin Up, and you can find it on page 99 of the 2008 -2009 Idea Book and Catalogue. I also used the Illuminations Stampin Around Wheel, and found the card was very quick to make. That is one thing I like about embossing. You can get such a great effect in such a short time. To make Embossing easy for yourself you will need the following equipment (all available from the Stampin Up Catalogue) Stampin Up card stock Versa Mark Ink Embossing Buddie Heat Tool Stampin' Emboss Powder (black, white, gold, silver and clear) Powder Pals. This Christmas card uses Taken with Teal, Tempting Turquoise and Whisper White card, Versa Mark, Gold Emboss Powder, Matt Pack- hole piercing guide, Tempting Turquoise Stampin Write Marker (for Faux Stitching around white card), Dimensionals, White Tafetta Ribbon, Round Rhinestone Brads - Ice. I had a bit of fun with this next Christmas card and decided to try a different shape from the regular rectangular card shape. I cut out lots of ovals, leaving a join on one side, and decided they would look quite good as an ornament. Again the embossing was very quick and the card was finished in no time at all.
Note the "hanging attachment". It is made by punching out a shape with the Round Tab Punch, embossing it in gold then punching the corners with the Designer Label Punch. All the Stampin Up ® punches can be found on page 143 of the Ideas Book and Catalogue. They are so very useful, make creating shapes a breeze and co-ordinate beautifully with so many of the Stampin Up stamp sets. The final card I have to show you is made with the traditional Keep Christmas stamp set on page 31. I loved this set from first sight - perhaps it reminds me of a very special Christmas spent with a wonderful family in the US when I was a teenager (many years ago), or perhaps it's just that I like using the Water Colour Technique so much and I felt sure this would be a very suitable set for that purpose. Here is what I did with the set.
I kept the colour range close to the card stock colours used - Purely Pomegranate and Blue Bayou from the 2008 -09 In Colour Range, and Ivories Natural (p. 133). As I used the Stampin Write Markers as my colour source, I used similar colours of Bravo Burgundy, Rose Red, Not Quite Navy, Creamy Caramel and Chocolate Chip. I know this technique can be confronting to some people, but it just takes a little practice to develop your own style. It often helps to copy for starters, then as you decide whether or not you like lots of water, little water or soft or dark colours, your style will develop, you'll gain confidence and enjoy this wonderfully relaxing technique. A hint that I've always found useful is to start with your light colours first and leave plenty of white or unpainted patches on the image. This gives you the opportunity to add more colour later and you can build up colour layers and shadows as the painting progresses. It's important when you use Stampin Write Markers as your colour source, to add just a very small amount of colour near the outline and blend it with your Aqua painter or watercolour brush, before it dries. This technique works so much better if you use Stazon Ink and Stampin Up Water Colour Paper because you can re-work the image a number of times and the paper will not distort due to being wet. It is also a relatively smooth watercolour paper, so your stamped images will print nicely. You can find it on page 133 of the catalogue. Find more examples of Christmas Cards and gifts here
|