|
Bodacious Bouquet Rubber Stamp Set and Rock 'n' Roll - How does That Work?
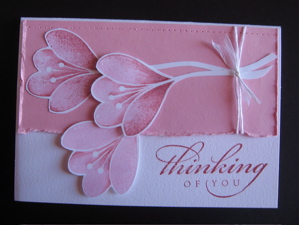
The Bodacious Bouquet rubber stamp set has fast become one of my favourites. I have to admit that it took a long time for me to purchase it as it didn't really "talk" to me from the catalogue. Now, I will keep it forever, even when it is retired! A couple of months ago a friend asked me to make a sympathy card for her to give to another friend. She wanted something that had very simple words on it - like "Thinking of You". Straight away I pictured the card, and this is how it turned out.
I really enjoy using the Rock 'n' Roll technique on solid stamp images as I love the serendipity effects you get. You never quite know how they are going to turn out! To overcome that to a certain extent, I modified the technique. Instead of rolling the stamp in a circular motion for the 2nd colour, I started at the base of the rubber stamp and gently rolled toward the top. The result still wasn't quite what I wanted so I turned to my trusty Blender Pens to add a little more controlled shading to the petals.
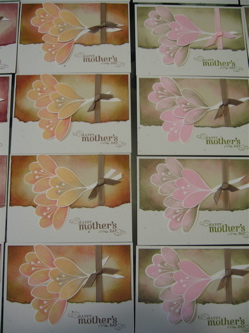
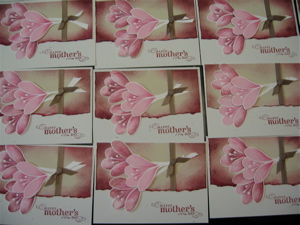
I was really happy with how this worked, and thought that the card design would lend itself to many other purposes. Convention 08 was coming up quickly (just a few days) and I still had not started my swaps, so I thought I would use this same card design and the Bodacious Bouquet stamp set, and just change colour combinations and the greeting. I used three different colour combinations: Close to Cocoa, Pretty in Pink, Rose Red. Pretty in Pink, Close to Cocoa, Mellow Moss. Apricot Appeal, Regal Rose, Close to Cocoa. You can see how each card becomes individual with small differences in shading and sponging.
The method I used for making these cards with the Bodacious Bouquet rubber stamp set is: Stamp multiple flower images onto Whisper White card stock using your base colour. This should be the lightest colour of the range you choose, and you will need to stamp one plain image for every 2 Rock 'n' Roll images. I wanted to cut each of these images out because I wanted a crisp white outline and a stem for each element of the design. (Be sure to leave enough blank white card for the stems). Enhance the floral images with your blender pen using the same colour you used for the Rock 'n' Roll technique. Cut out each flower - visualize the shape of the stem you want and cut it free hand. Next prepare the card shape. (I used A5 size in Confetti White for the base with a Naturals Ivory overlay). Adhere 2 images to Naturals Ivory card stock that has been sponged with all 3 colours, and has one edge torn and distressed. Raise the 3rd image off the page at the flower head only, using dimensionals, tie some Close To Cocoa Grosgrain ribbon around to cover the joins of the stems, and adhere this to the base card.
Use the Stamp-a-ma-jig to position any greeting exactly where you want it. If you would like more information on how to make cards like this with the Bodacious Bouquet or any other Stampin' Up! rubber stamp sets contact me and I will assist you. If you prefer some hands-on assistance, I can to do workshops all over Canberra and the surrounding regions, and would love to create a custom workshop just for you. If you would like to
purchase the Bodacious Bouquet rubber stamp set,
you can fill out the form, or you may prefer to book a workshop. As a hostess you will receive a FREE Ideas Book and Catalogue (value $12.95), experience a fun night of learning different stamping techniques and projects and have the opportunity to earn beautiful hostess gifts and free spending dollars.
See other examples of the Rock n Roll Technique
|